Showing posts with label Dessert. Show all posts

Thursday, 20 May 2021

COFFEE ICE-CREAM


We had locked Danny out in the balcony as Skip was having breakfast. I was at my work desk, whipping out a draft when I heard Skip call out for me, followed by some incoherent sounds.

Lockdown has given me selective deafness and I wondered if it had turned into the actual one. While I wriggled my pinkie in my ear, the calls became frantic. Skip was standing with the plate in his hand, pointing towards the curtain rod adjoining the door that led to the balcony. I kept staring at it, seeing nothing untoward…

…until I heard the word Squirrel. ( I’m getting goosebumps even as I type this out). Those new to my blog may perhaps not know of my extreme fear of critters (including birds) that enter the house. I am at times unable to move in fear and have been known to abandon my baby and run for my dear life when a vicious  magpie, looking to attack only me, entered the house.

I, thankfully had my phone with me. I called my father-in-law and  whilst precious seconds ticked away, having to listen to the recorded, automated message on the importance of vaccination, Skip and I  had our eyes glued on the squirrel. I mustered enough courage to be able to talk in my extremely calm, low-pitched voice (at times like these, I cannot scare people by howling into the phone as soon as they receive the call) and asked him to come up and save us from the squirrel.

What followed was a chaotic chase. Danny had to be let in as the balcony door had to be opened to let the squirrel out. Danny spotted the critter and started barking. The Squirrel jumped on to our bar section and curled up into a ball (it was all an act, I would say). I pulled Skip in front of me as a human shield. My father-in-law, coolly walked into the kitchen, got a long-handled broom and gently prodded the squirrel out of the house. It ran out and jumped on to the jackfruit tree facing our house.

Skip proclaimed I had frightened the Squirrel away.

All in a ‘work from home’ day’s work!


My favourite flavour in ice-cream is coffee and while adding the coffee powder, I wondered if it was enough for the flavour to come through.

Yes, it was!

Oh, how I miss the Corner House Coffee Ice-Cream but I could confidently say this came pretty close to it in taste, if not in texture.

If you do not have heavy cream, you can also use fresh cream. Read up on how to use fresh cream for ice creams on this post – Mango icecream.

Stay home, stay safe and follow me on Facebook and Instagram (Lucidlucent).


COFFEE ICE-CREAM

Ingredients:

Instant coffee powder – 3 gms (2 tsps)

Hot water – 2 tbsps

Heavy cream – 250 gm (1 cup)

Condensed milk – 200 gm (1/2 cup)


Method:

1.     Whip the cream and set aside.

2. Dissolve the coffee powder in hot water. Once cooled, add it to the condensed milk and mix well.

3. Add the whipped cream to the condensed milk mixture and mix until fully combined.

4.     Pour the mixture into the ice-cream tin. You may also additionally pour coffee decoction on the ice cream mixture and swirl it.

5.     Freeze it overnight.

6.     Done.


Monday, 29 March 2021

OREO ICE CREAM


Those easily offended by ‘bad’ words may kindly skip to the recipe.

The ‘F’ word is banned in our house.

We have a child, of an impressionable age at home. He’s 8 years old. I call him Skip in my posts. The other day (when I say the other day, I mean pre-covid days) when I was out, I heard a little boy, who I think was in Standard V, use the F word and my inner 1980s self, went “cheee bad word, I’ll tell your Mummy”. Of course, that’s not what happened, I just gave the child a stiff smile and moved on. This had me wondering if Skip used the word too.

He doesn’t. (Need to put this out soon else my parents who read all my posts will be calling me up even before they finish reading this).

I overheard this conversation between Skip and Sky.

Skip: I know many bad words.

Sky: Uh huhn *and gets back to work*

Skip: verry very bad words.

Sky: Which all?

Skip: *giggles*I don’t want to say.

Sky: You can tell me, I bet I know all those words.

Skip: I can’t.

Sky: Does it rhyme with duck?

Skip: *peals of laughter*

I don’t honestly understand the fascination with the word FUCK anymore. It’s so overused, it’s lost any “appeal” it had. It’s no longer the forbidden word. Apparently 6-year-olds are using it. We need to come up with a new word.

My choice of ‘bad’ words is bloody and shit and when I’m really angry, I use them together. I must confess, when I’m driving, I switch to Hindi.

I must clarify the F word banned in our house currently is FOOD.

That’s one of the few words, the Puppy recognises. Skip now uses our technique on the Puppy. He spells words he doesn’t want Puppy to understand. “Should I bring him his F-O-O-D?”


Summer is on us and it’s time to stock up on ice-cream unless you have a ‘tickle’ in your throat, then please do avoid refrigerated items. Now is not the time to tempt fate.


This recipe follows the same method as the mango ice-cream and Skip says it’s the best ice cream he’s ever eaten !!!


OREO ICECREAM

Ingredients:

Oreo biscuits – 12 + 5

Heavy cream – 250 gm (1 cup)

Condensed milk -   200 gm (1/2 cup)


Method:


1.    Powder about 12 Oreos in the blender.

2.  Mix the powdered Oreos with the condensed milk. (It will solidify in some time, it’s fine)

3.    Whip the cream.

4.  Add the condensed milk-oreo mixture to the cream and mix until fully combined. (You may also coarsely chop some oreos and mix it in).

5.     Pour the mixture into the ice cream tin. Top it with chopped oreos (minus the cream filing).

6.    Freeze it overnight.

7.  Done. 


I do hope you try the ice-cream because it’s fucking good. *cheee, bad word, need to rinse mouth with ice cream*


Thursday, 12 November 2020

PEAR CRISP


29.10.2020: If you would recall from my last post on Pears (Pear Cobbler), I had some extra poached pears left over from the Cobbler. I refrigerated it overnight and used it the next day to make this Crisp.

I followed the quantities mentioned in the recipe and ended up with extra topping. Not wanting to again, store the toppings, I dumped it all on the poached pears. Also, the amount of peanut butter wasn’t clear in the recipe. It appeared as 1 cup which I thought was too much and noticed the same pointed out in the comment section. So I ended up putting too little of it. Halfway through baking, I pulled the dish out and added some more peanut butter and ended up making a bit of a mess which I have expertly covered with ice cream and a flower :D in the picture.

The quantities mentioned below are perfect for a 5-6 inch baking dish. You can easily adjust the quantities as per the size of your dish.

Skip said this was better than the Apple Crisp as the crust had a lovely peanut butter flavour. You can use any recipe for a Crisp and substitute plain butter with peanut butter. We had it warm with a scoop of mango ice cream (vanilla wasn’t available!!!)


Now that Skip and I spend a lot of time with each other, there are days when we get on each other’s nerves and end up quarrelling like siblings. I hadn’t realised that I ask Skip to not act stupid when he misbehaves. The other day when I said ‘stupid’ in anger, Skip looked hurt and said that he wasn’t one and that I shouldn’t keep calling him that. I felt rotten, I didn’t want my son growing up thinking he was stupid because his mother called him that thoughtlessly in a fit of anger. In the evening I called him aside and apologised and explained that I used the word ‘stupid’ merely to express my anger at him and that it was wrong to do so. We sat and pondered for a bit over what word I could use instead. We have decided on using the word ‘gemstone’ (there’s really no reason for having chosen that word). So now, when he doesn’t behave, I call out gemstone and he rolls his eyes, stops the mischief and pretends to sulk but I have noticed a little smile creep across his face.


PEAR CRISP

Ingredients:

Pears – 2

Ground cinnamon – ½ tsp

Sugar – 2 tbsp

Oats – ¼ cup

Whole wheat flour – 2 tbsp

Chunky sweetened peanut butter (cold) – 4-5 tbsp

Nuts/seeds – optional


Method:

1.     Toast the oats either on a pan or in the oven for 5-8 minutes until they turn golden brown.

2.     In a saucepan, add chopped pears, sugar and cinnamon and cook on medium heat until the sugar melts and the pears soften.

3.    In another bowl, combine the oats and wheat flour (and nuts/seeds). Add the peanut butter in batches and rub the mixture between your fingers until it resembles bread crumbs (chunky bread crumbs). If you feel the need to add more peanut butter, please do so. The mixture shouldn’t be dry.

4. Transfer the cooked pears into the baking dish ( I used a 6 inch dish). Evenly sprinkle the peanut butter mixture over it  and bake it at 180 C for about 20 minutes until the top layer has browned.

5.     Done.


Sunday, 1 November 2020

PEAR COBBLER


28.10.2020: Shugu sent me a bag full of juicy pears and I immediately set about looking for some pear recipes. After a few minutes of scrolling and not having found anything to my liking, I googled peach cobbler and came across this recipe by Preppy Kitchen. I replaced pears with peaches.

The recipe calls for using a 9*13 inch dish. While I flitted about in the kitchen waiting for the butter to melt in the dish, I realised that the flour batter wouldn’t be enough for a dish this large and I didn’t want to eat a flimsy, thin slice of cobbler. I transferred the melted butter into an 8 inch baking dish and poured the flour batter into it only to then realise that I had chopped too many pears. I set aside a quarter of the pears. I will soon be posting the recipe for a Pear Crisp. Be sure to follow me on Facebook and Instagram @lucidlucent. This crisp calls for something different from the regular recipes for a Fruit Crisp. I also have the  recipe for an Apple Crisp on my blog.

Doesn’t this Cobbler look so pretty with its uneven, bumpy surface? The top feels like a springy cake and base has sweetened, sticky pears. I wanted to have it with a scoop of vanilla ice cream, but the thought itself of walking 100 metres to the store close by tired me out. 


You may have it plain or have it warm with ice cream, either way it tastes delicious.  


 PEAR COBBLER  

Ingredients:

For the pears:

Pears – 4 yellow ripe ones

Granulated sugar – ¼ cup (50 gms)

Brown sugar – ½ cup (50 gms)

For the cobbler:

Butter – 7 tbsp

All-purpose flour (maida) – 1 cup

Granulated sugar – ¾ cup

Baking powder – 2 tsp

Salt – ¼ tsp

Milk – ¾ cup

Cinnamon – ½ tsp


Method:

1.     Preheat the oven to 180C.

2.  Chop the pears into bite sized pieces (or smaller) and transfer to a pan. Add the granulated and brown sugar to it. Mix well. Heat on medium flame for about 5 minutes until the sugars dissolve and the pears are partially cooked in the sugar syrup. Set aside.

3.     Place the butter in the baking dish and pop it into the oven. In the ‘warm’ mode let the butter melt. Set aside.

4.     In a mixing bowl, mix the flour, sugar, salt, baking powder and cinnamon. Pour in the milk and mix till no lumps are visible.

5.   Transfer this batter to the baking dish with butter. Do not mix but spread the batter to cover the edges.

6.  Transfer the pears along with the liquid onto this batter. Again, do not mix but spread it evenly making sure to leave some gaps between the pear bits.

7.     Bake at 180C for about 40 mins or until done.

8.     Done.


       Recipe Notes:


·       If you don’t have cinnamon, you may use cardamom powder or vanilla essence.


Tuesday, 20 October 2020

EGGLESS WHITE CHOCOLATE BLONDIE


11.10.2020: I have never liked white chocolate. Even as a child when I was of the age when anything sugary that had the word chocolate in it was a source of immense pleasure, I stayed away from Milkybar (give me the power!).

I accidently bought a bar of white chocolate instead of dark chocolate. When I enter a departmental store, I’m like a kid in a candy store. I love walking up and down the aisles, checking out all the jams and sauces and preservatives and snacks and biscuits and during this period, I oft confuse brands and products and realise my mistake only after I return home.

The bar was lying in the fridge, having used only a quarter of it for decorating desserts. I decided to make Blondies with it. I was always under the impression that a Brownie with white chocolate was called a Blondie, I have however come across recipes for Blondies with ‘brown’ chocolate too. If someone would like to clarify this, please drop a comment in the comment section below.

This recipe is adapted from ‘From Noopur’s Kitchen’ and its eggless !


I have always loved chewy desserts. I may have over baked the Blondie by 5 minutes and its edges got a bit crunchy but then I love crunchy edges. The white chocolate lends a wonderful flavour and the walnuts a lovely crunch. If you are planning to store this in the fridge, please let it come to room temperature before you eat it. Let the Blondie cool completely before you cut it into squares else it will crumble.


EGGLESS WHITE CHOCOLATE BLONDIE

Ingredients:

All purpose flour (Maida) – 120 gms ( 1 cup plus 2 tbsps)

Cornflour – about 25 gms (2.5 tbsp)

Butter -  56 gms ( ¼ cups)

Light brown sugar – 4 tbsp

Condensed milk – 150 ml

Baking powder – 1 tsp

Baking soda – ½ tsp

Vanilla essence – 1 tsp

Milk -1/2 cup

Vinegar – 1 tbsp

White chocolate chips/chunks – 75 gms

Walnuts (chopped) – about 20

Caramel sauce (optional)

Sea salt (optional)


Method:

1.     Preheat the oven to 180C and grease an 8-inch baking dish.

2.     Melt the butter and let it cool slightly.

3.    Sieve the dry ingredients ( flour, cornflour, baking powder, baking soda) at least 5 times.

4.   Chop the white chocolate and walnut and add about 2 tbsps of the above flour mixture to this, mix well and set aside.

5.   To the melted and cooled butter, add condensed milk and mix it well. To this add milk, vanilla extract and vinegar. Add the brown sugar and milk well.

6.   Add the dry ingredients( from Step 3) to the wet and mix until there are no lumps. Do not overmix.

7.     Add the chocolate and walnuts from Step 4.

8.   Pour into the greased tin. You may also scatter some white chocolate on top or drizzle caramel sauce on the batter and sprinkle a little sea salt.

9.     Bake for about 30-35 minutes or until the skewer inserted comes out clean.

10. Done.


Monday, 28 September 2020

FRENCH APPLE CAKE


26.09.2020: About 5 years ago, I had come across the recipe for the French Apple Cake which I had saved on my phone. During one particularly tiresome day, when I was feeding a fussy 3-year old Skip and not even his favourite Red Riding Hood video came to the rescue, I handed over the phone to him only to later find my entire folder of recipes deleted!

Out of sight, out of mind. This recipe had completely slipped my mind until...

A few days ago, when I opened the fridge for a regular inspection to check what items were left ignored or hidden away behind frequently used items, I found apples, nestled amongst little cartons of spices. In no mood to eat apples as is, I decided to bake a cake with them instead.

As I scrolled through many recipes, wondering which one would work best, I decided to bake the one from ‘Pardon your French’.


Then began the search for the liquor. We hardly ever have Dark Rum, Cognac or Brandy at home. After a little looksie here and there, Sky got a little bottle of Armagnac. After a quick search on liquor substitutes, I decided to go ahead with the Armagnac but poured a negligible quantity (about 10ml) to the cake. (I should have poured more). If you do not want to use alcohol, you may substitute it with apple juice but a classic French Apple Cake is one with a buttery, Rum flavoured crumb.


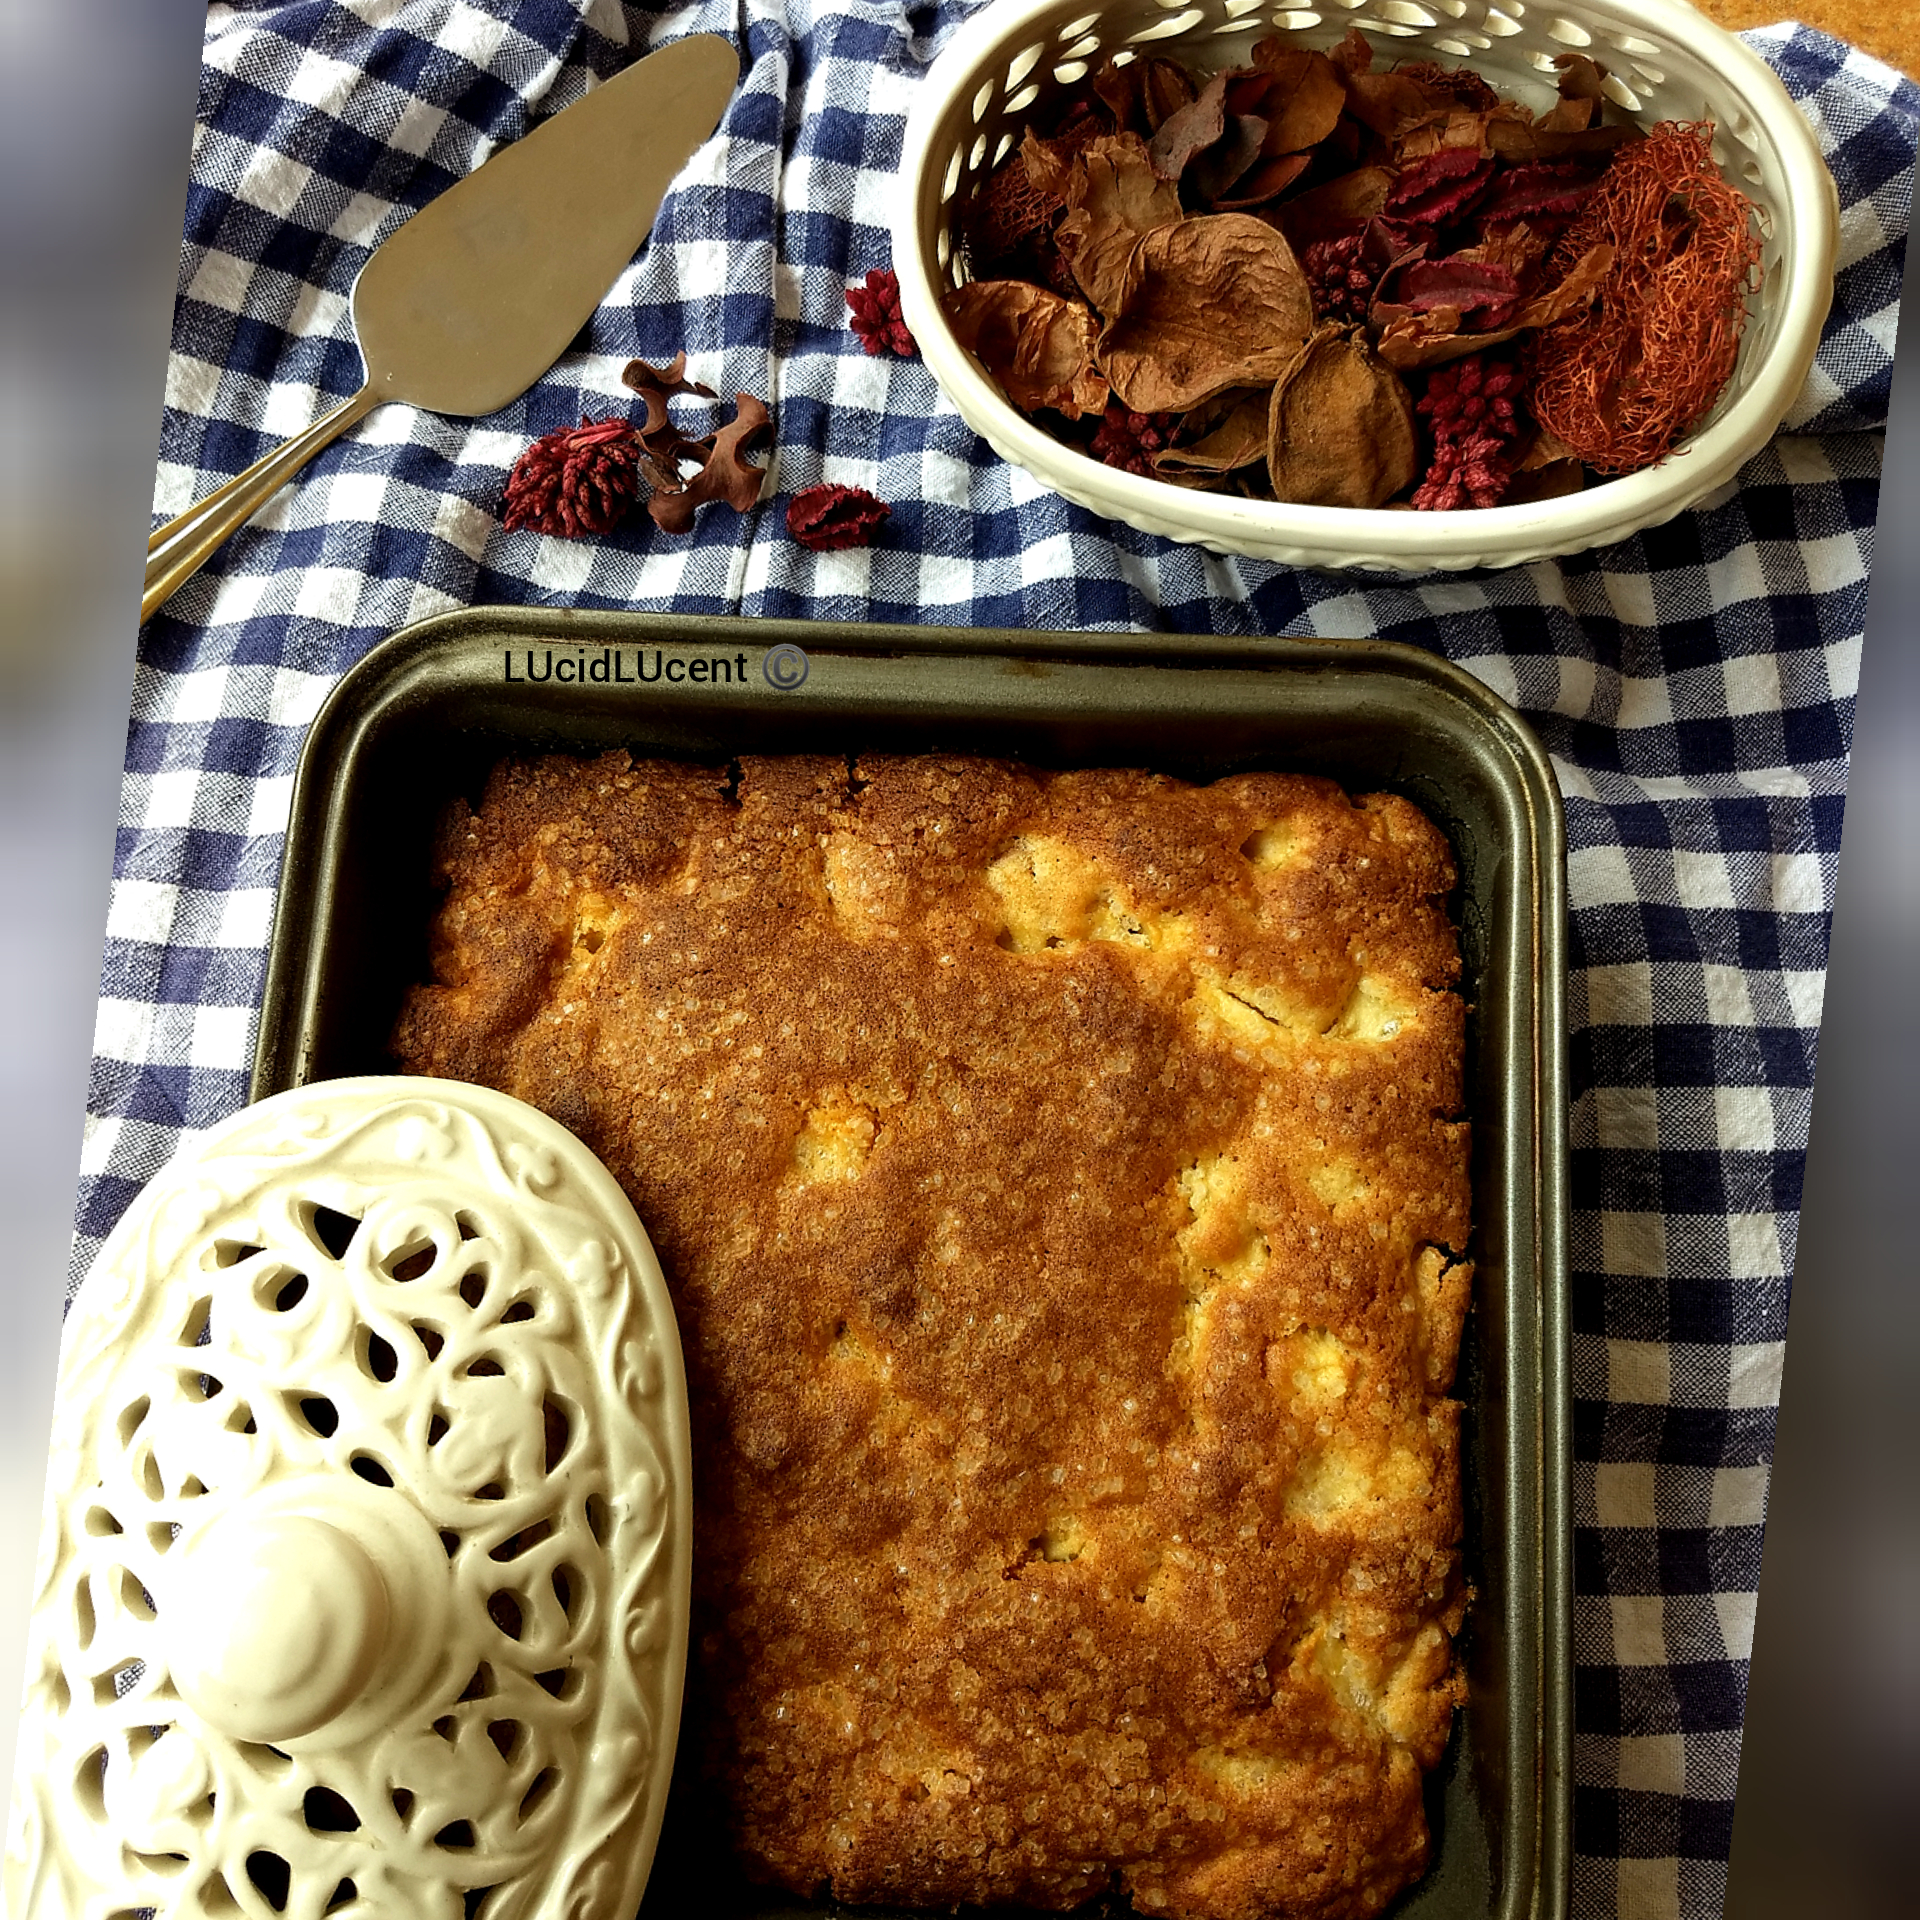
This cake is the most delicious of all the apple cakes I’ve ever baked. The melted butter forms a wonderful crust on the cake, the sugar sprinkled on top adds a lovely crunch (though it doesn’t help aesthetically, in my opinion) and the cake in itself is buttery and crumbly and fluffy with sweet, softened apples.

I am not a big fan of apples, but I do love them in desserts!


FRENCH APPLE CAKE

Ingredients:

Apples- 2 regular sized

Unsalted butter – ½ cup (125 gms)

All-purpose flour (maida) – 1 cup (125 gms)

Baking powder – 1 tsp

Salt – a pinch 

Eggs – 2

Granulated sugar – ¾ cup (150 gms) + 2 tbsps

Vanilla essence – 1 tsp

Dark rum/cognac – 3 tbsps (45 ml)


Method:

1.     Preheat your oven to 180C and prepare your baking dish. (I used an 8 inch pan).

2.     Melt the butter. Set aside and let it cool.

3.     Peel and core the apples and chop them into tiny pieces (about ½ an inch). (If you like your cake to have chunky pieces, dice the applies into bite sized portions).

4.     Sieve the flour, baking powder and salt.

5.     In a mixing bowl, beat the eggs with the 150 gms sugar for about 8 minutes until it is light and fluffy and doubles in volume. (I used an electric beater for this).

6.     With a rubber spatula or a whisk, gently stir in the vanilla and the alcohol.

7.     To this, add half the flour mixture and gently stir. Add in half the melted butter and stir. Stir in the remaining flour mixture, stir and then the remaining melted butter. DO NOT OVERMIX.

8.     Fold in the apples and stir until the pieces are evenly coated with the batter.

9.     Pour into the baking dish and sprinkle the 2 tbsps sugar evenly on top of the batter. Bake at 180C for about 40 minutes or until done.

10. Done.


Saturday, 26 September 2020

4-INGREDIENT OREO TART


 24.09.2020: The time was 8.30 pm. Post dinner, the three of us had retired into our respective nooks in the house. 

Was it time already for the next blog post? I jumped out of the rickety chair and announced loudly that I would be preparing an Oreo Tart. Skip left his candles and dashed to the kitchen as I started barking out instructions to keep butter out of the freezer, to get Oreos from my ‘hiding place’.

The Oreo Tart has been on my ‘list’ for the longest time. However, I always was short of one ingredient. That night I had all the ingredients. I held Skip by his hand and looked him in the eye and told him that we wouldn’t be eating the tart that night as I had to take pictures of it the next day. Skip asked me to finish the photography before he woke up so he could dig right in upon waking up.


That night, Skip and I lay awake till midnight, thinking about the tart in the fridge after having promised each other that we wouldn’t sneak a bite of it. 


Let’s first start with how simple this is. It requires ONLY 4 ingredients, a little bit of blending, heating and stirring and it’s done. Please use the best quality dark chocolate as its taste will stand out. The filling is silky, smooth, fudgy chocolate on a delightful base of crumbly oreos. I wouldn’t recommend adding any additional toppings (chopped oreos, chocolate shavings) as that may get too sweet.

Make this the previous night and it’s ready to be eaten the next day. Choose the dish according to the quantity, you don’t want to end up with thin slices of the tart.


OREO TART

Ingredients:
Oreo biscuits – 24
Melted butter – 2 tbsp+ 3 tbsp
Cream – 100 gms
Dark chocolate – 100 gms
Roasted, chopped walnuts – ½ cup (optional)

Method:
1.     Crush the biscuits in a blender into a fine powder. Add 2 tbsp melted butter to it and give it a quick whizz.
2.     Grease a dish (I used a 7*5 inch dish) and smooth down the powdered Oreos into it to form the base of the tart. Refrigerate it for half an hour.
3.    In the meantime, prepare the chocolate ganache. Heat cream and 3 tbsp butter until a gentle boil appears. Remove from heat and add chopped chocolate to it. After a few minutes, stir the chocolate until it fully melts.
4.     Add the chopped and roasted walnuts into the ganache. Once the ganache cools, pour it onto the Oreo base.
5.     Refrigerate for a minimum of 5 hours or overnight.
6.     Done.


Recipe Notes:

  •       Heavy cream would be ideal. I have used the regular Amul cream and the tart tasted great.


Related Posts Plugin for WordPress, Blogger...