Showing posts with label Easy Bake. Show all posts

Friday, 16 April 2021

ALMOND COOKIES


ALMOND COOKIES

15.04.2021: R, my cook, is not keeping well and my breakfast on such days is usually bread. While, Skip, ALWAYS has bread with peanut butter, Sky and I try out different stuffing. Today we had cucumber sandwiches and cold boiled egg sandwiches.

For the cucumber sandwich, slather home-made butter on both slices of bread. Cut the cucumber into thin slices, place it on the buttered slice of bread, sprinkle some salt and pepper. I like to add tomatoes too but I didn’t have any at home. Big Basket has been acting up as covid cases are on the rise. Folks, you do not need twenty sachets of yeast and do leave some Haldiram packets for me!!!!

I was excited for Skip and Sky to try out the cucumber sandwiches as these were my favourite sandwiches in my childhood.

Sky may have loved it, I wouldn’t know. Just as he took his first bite, he received a call from his client and my raised, hopping eyebrows and elaborate hand gestures enquiring after the taste went unanswered.

I didn’t make the egg sandwich for Skip as he is not very experimental with his food but I wanted him to try the cucumber sandwiches. As I was making his sandwich, he kept staring at the slices of cucumber being placed on the bread and he didn’t look pleased.

This wasn’t going well.

K: Did you know these were my favourite sandwiches when I was in the 4th Standard.

S (in a deadpan voice): Well, then why am I being made to eat it?

He rated them 3/5.


Today’s recipe is Almond Cookies.

For more such recipes, you may follow me on Facebook and Instagram @lucidlucent. Thank you.


ALMOND COOKIES (makes around 15 cookies)

Unsalted Butter (at room temperature) – 50 gms

Powdered Sugar – 50 gms

Refined Flour (Maida) – 75 gms

Baking Soda – ¼ tsp

Salt – ¼  tsp

Chopped Almonds – 40 gms (this is just a random number, I don’t remember how much I added, probably just chucked a handful of them)


Method:


1.      Mix butter and sugar well.

2.    Sieve flour, salt and baking soda and add to the butter mixture.

3.   Add the chopped almonds and mix them to make the cookie dough.

3.      Make walnut sized balls.

4.      Bake at 160C for 10-15 mins.

5.      Done.


Recipe Notes:

·       The oven’s temperature and timing would vary as per your oven’s specifications.

·       You’ll know the cookies are done when they have puffed up and browned a bit. The cookies will be soft even when done and will harden upon cooling.

·       If you feel the dough is too soft to be shaped into a ball, you can add some more flour or you could also refrigerate the dough for half an hour until it hardens.


Tuesday, 12 January 2021

PIZZA BASE (WITH YEAST)


Since I got the doughnuts (with yeast) right, I have overcome my fear of using yeast and naturally proceeded to make pizza.

So simple to make! What else can I say.


While we were eating it, I wondered why I spent so much moolah ordering Pizzas from Dominos (pizza aficionados may stick your noses up in the air, Skip and I love pizzas from Dominos) when one could just bake them at home.

The base is crunchy and chewy. If you don’t have yeast at home, you can make the No-Yeast Pizza base and if you don’t have an oven at home, you could try these Whole Wheat, Stove-top Pizzas. The base with yeast does taste the best but the others are great alternatives too.


I made a 6 inch Margherita for Skip and a large veggie one for Sky and me.  

We had a few slices left over. We heated it and ate it the next day, it still tasted great.

This recipe is from Sally's Baking Addiction.


PIZZA BASE (WITH YEAST) ( MAKES TWO 12 INCH BASES)

Ingredients:

Warm water – 1 1/3 cups (320 ml)

Instant yeast – 2 ¼ tsp

Granulated sugar – 1 tbsp

Oil – 2 tbsp

Salt – 3/4 tsp

All-purpose flour – 3 ½ cups (450 gms)

Cornmeal – for dusting the pan


Method:


1.     Add the warm water, yeast and sugar to a bowl and whisk it well. Cover and let it rest for 5 minutes.

2.     The liquid will appear frothy after 5 minutes.

3.     To this, add oil, salt and the flour and mix it with a spatula till it comes together.

4.  On a floured surface, knead the dough for about 5 minutes. ( The dough should remain soft).

5.    Grease a bowl and place the dough in it, covering it with the oil. Cover the bowl and let the dough rise.

6.     After 60-90 minutes , the dough would have doubled in size.

7.     Preheat oven to 250C for at least 15-20 mins.

8.  Shaping the dough : when  the dough has doubled up in size, punch it down to release any air bubbles. Divide the dough in half (to make two pizza bases). Flour your work surface and flatten the dough with either a rolling pin or your hands. Pinch the edges of the base and poke holes in the base with a fork.

9.     Grease the baking dish and sprinkle cornmeal/semolina on it.

10. Place the base on the baking dish, brush the top lightly with oil and add your favourite toppings.

11. Bake the pizza for about 12-15 minutes until the bottom has browned.

12. Done.


Recipe Notes:

  •      Preferable use Olive oil if you have it.
  •       I didn’t have cornmeal so I used semolina for dusting.
  •       Step 4: you know the dough is ready to rise when you poke it with your finger and it slowly bounces back. If it doesn’t, continue kneading. 
  •      I tried using a rolling pin to shape the dough but found it easier using my hands to stretch the dough.

P.S: I still continue to order from Dominos. Let’s be honest here, it’s sometimes just easier  to order than cook at home.


Tuesday, 20 October 2020

EGGLESS WHITE CHOCOLATE BLONDIE


11.10.2020: I have never liked white chocolate. Even as a child when I was of the age when anything sugary that had the word chocolate in it was a source of immense pleasure, I stayed away from Milkybar (give me the power!).

I accidently bought a bar of white chocolate instead of dark chocolate. When I enter a departmental store, I’m like a kid in a candy store. I love walking up and down the aisles, checking out all the jams and sauces and preservatives and snacks and biscuits and during this period, I oft confuse brands and products and realise my mistake only after I return home.

The bar was lying in the fridge, having used only a quarter of it for decorating desserts. I decided to make Blondies with it. I was always under the impression that a Brownie with white chocolate was called a Blondie, I have however come across recipes for Blondies with ‘brown’ chocolate too. If someone would like to clarify this, please drop a comment in the comment section below.

This recipe is adapted from ‘From Noopur’s Kitchen’ and its eggless !


I have always loved chewy desserts. I may have over baked the Blondie by 5 minutes and its edges got a bit crunchy but then I love crunchy edges. The white chocolate lends a wonderful flavour and the walnuts a lovely crunch. If you are planning to store this in the fridge, please let it come to room temperature before you eat it. Let the Blondie cool completely before you cut it into squares else it will crumble.


EGGLESS WHITE CHOCOLATE BLONDIE

Ingredients:

All purpose flour (Maida) – 120 gms ( 1 cup plus 2 tbsps)

Cornflour – about 25 gms (2.5 tbsp)

Butter -  56 gms ( ¼ cups)

Light brown sugar – 4 tbsp

Condensed milk – 150 ml

Baking powder – 1 tsp

Baking soda – ½ tsp

Vanilla essence – 1 tsp

Milk -1/2 cup

Vinegar – 1 tbsp

White chocolate chips/chunks – 75 gms

Walnuts (chopped) – about 20

Caramel sauce (optional)

Sea salt (optional)


Method:

1.     Preheat the oven to 180C and grease an 8-inch baking dish.

2.     Melt the butter and let it cool slightly.

3.    Sieve the dry ingredients ( flour, cornflour, baking powder, baking soda) at least 5 times.

4.   Chop the white chocolate and walnut and add about 2 tbsps of the above flour mixture to this, mix well and set aside.

5.   To the melted and cooled butter, add condensed milk and mix it well. To this add milk, vanilla extract and vinegar. Add the brown sugar and milk well.

6.   Add the dry ingredients( from Step 3) to the wet and mix until there are no lumps. Do not overmix.

7.     Add the chocolate and walnuts from Step 4.

8.   Pour into the greased tin. You may also scatter some white chocolate on top or drizzle caramel sauce on the batter and sprinkle a little sea salt.

9.     Bake for about 30-35 minutes or until the skewer inserted comes out clean.

10. Done.


Thursday, 15 October 2020

EGGLESS DATE AND WALNUT CAKE


 07.10.2020: The past few years I’ve had many requests for eggless cakes but I’ve always avoided making eggless bakes under the (false) presumption that cakes with eggs would be fluffier and lighter. The Eggless Banana Bread with Walnut Streusel put an end to these preconceived notions and while I still don’t specifically go about looking for eggless recipes, I’ve been more open to trying these eggless cakes if I happen to come across them.

My mother used to bake a scrumptious, sticky Date Cake which was rich and decadent and had the strong caramel taste of dates. Though she has sent me the recipe for it thrice already, I keep inadvertently deleting the message (If you are reading this, please send it again).

I always have a box of dates lying about in the house. For some reason, my father in law and my mother think that Skip loves dates and send me a box once in a while. Even though I know Skip hates dates and I have cause to believe that my skin breaks out when I eat them, I buy a box because I like to stock up on healthy food ( It’s not just Haldirams and Laxmi Narayans ðŸ˜‰).


I had two boxes of dates in the house and was looking for recipes with Dates when I came across this recipe on lovenadflourbyPooja. I follow her on Instagram as she has some amazing recipes. You may check out the Eggless Lemon Loaf that I baked following her recipe.

I also have a recipe for Bliss Balls saved which I plan to make soon. Please do follow me on Facebook and Instagram @lucidlucent and you’d be notified when that post goes up.

This cake is definitely one of the best cakes I’ve baked. It is moist, has a wonderful (but not too strong) flavour of dates. Skip loved it too, even after I told him it had dates. At times, I skip adding nuts to cakes, but I would highly recommend adding walnuts as it tastes wonderful with dates.


EGGLESS DATE AND WALNUT CAKE

Ingredients:

Chopped and Pitted dates- 1 cup

Milk – 1 cup

Sugar – 3 tbsp

Oil – 1/3 cup

Flour – 1 cup

Baking powder- ½ tsp

Baking powder – ½ tsp

Walnuts – ½ cup


Method:

1.     Preheat the oven to 180C and grease a 6 or 7 inch baking dish.

2.     Soak ½ cup of the dates in half a cup of hot milk for at least an hour and then grind it into a smooth paste.

3. To the above date paste, add oil, sugar and remaining milk and mix well with a whisk.

4.  In a separate bowl, sieve flour, baking powder and baking soda. To this, add the remaining dates and walnuts and mix well until the dates and walnuts are covered in the flour mixture.

5. Add the flour mixture to the wet ingredients and mix until streaks of flour disappear.

6.     Transfer to the baking dish and bake for about 35-40 mins or until done.

7.     Done.


Monday, 28 September 2020

FRENCH APPLE CAKE


26.09.2020: About 5 years ago, I had come across the recipe for the French Apple Cake which I had saved on my phone. During one particularly tiresome day, when I was feeding a fussy 3-year old Skip and not even his favourite Red Riding Hood video came to the rescue, I handed over the phone to him only to later find my entire folder of recipes deleted!

Out of sight, out of mind. This recipe had completely slipped my mind until...

A few days ago, when I opened the fridge for a regular inspection to check what items were left ignored or hidden away behind frequently used items, I found apples, nestled amongst little cartons of spices. In no mood to eat apples as is, I decided to bake a cake with them instead.

As I scrolled through many recipes, wondering which one would work best, I decided to bake the one from ‘Pardon your French’.


Then began the search for the liquor. We hardly ever have Dark Rum, Cognac or Brandy at home. After a little looksie here and there, Sky got a little bottle of Armagnac. After a quick search on liquor substitutes, I decided to go ahead with the Armagnac but poured a negligible quantity (about 10ml) to the cake. (I should have poured more). If you do not want to use alcohol, you may substitute it with apple juice but a classic French Apple Cake is one with a buttery, Rum flavoured crumb.


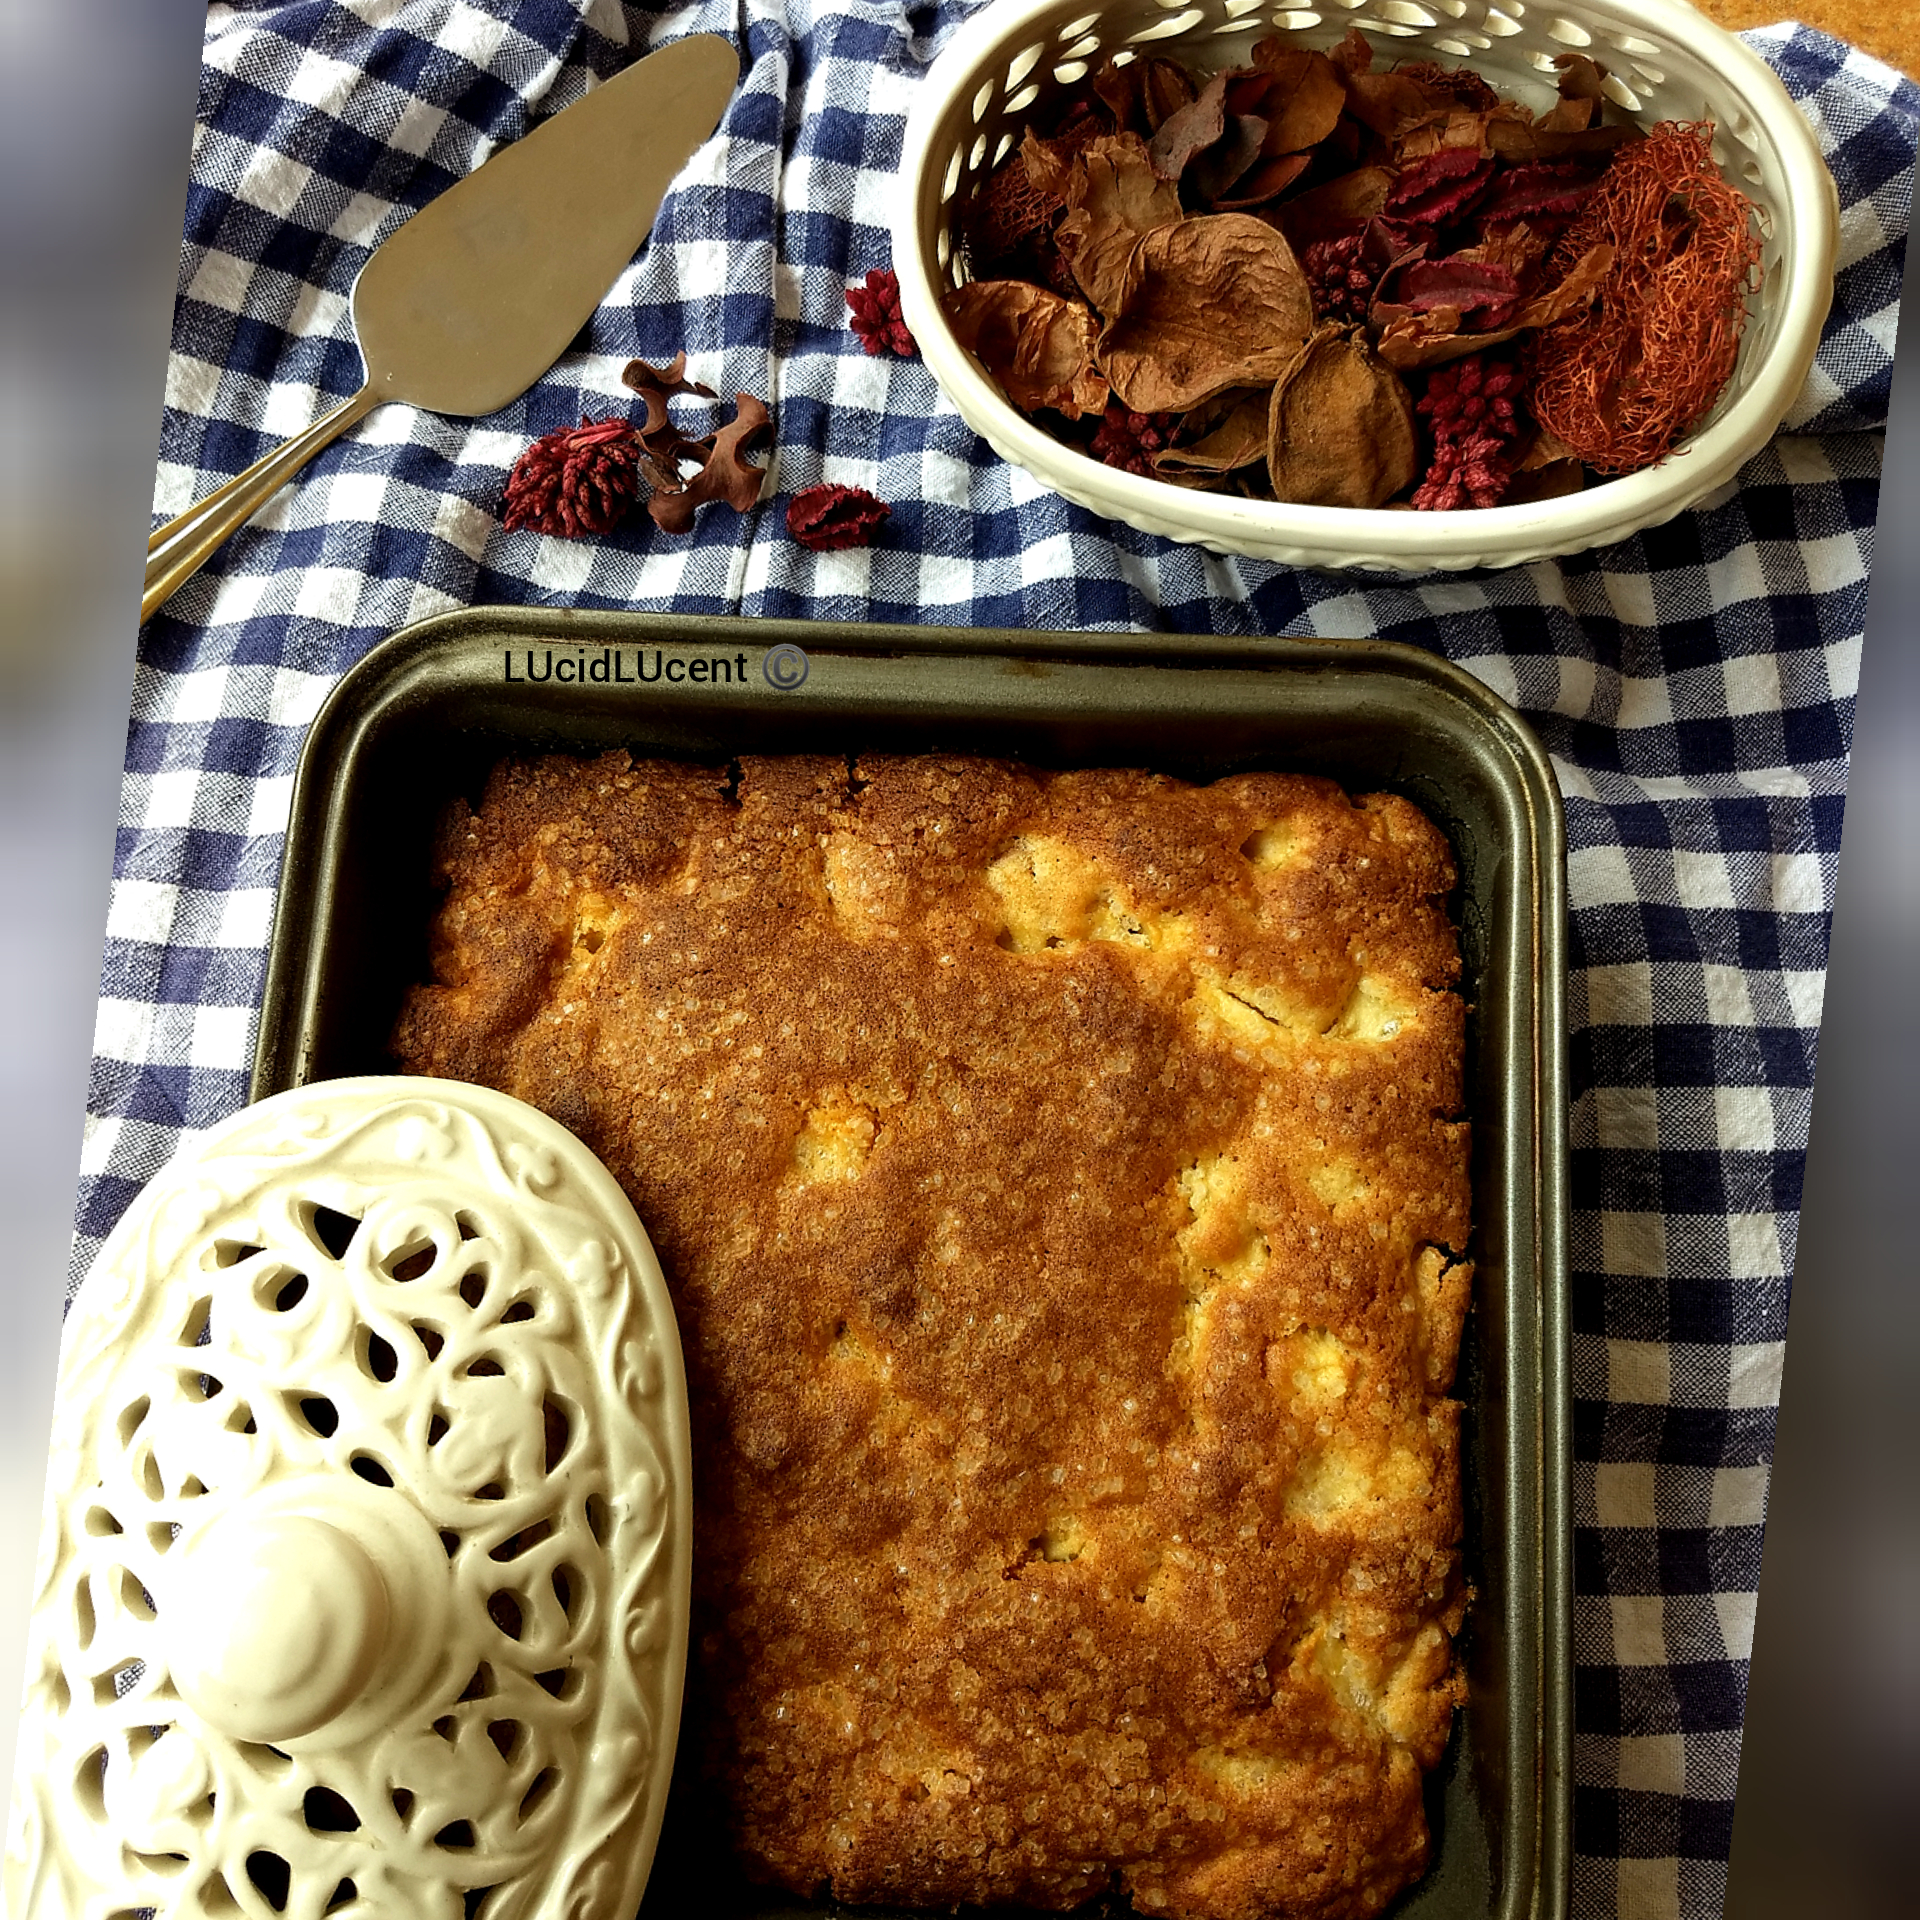
This cake is the most delicious of all the apple cakes I’ve ever baked. The melted butter forms a wonderful crust on the cake, the sugar sprinkled on top adds a lovely crunch (though it doesn’t help aesthetically, in my opinion) and the cake in itself is buttery and crumbly and fluffy with sweet, softened apples.

I am not a big fan of apples, but I do love them in desserts!


FRENCH APPLE CAKE

Ingredients:

Apples- 2 regular sized

Unsalted butter – ½ cup (125 gms)

All-purpose flour (maida) – 1 cup (125 gms)

Baking powder – 1 tsp

Salt – a pinch 

Eggs – 2

Granulated sugar – ¾ cup (150 gms) + 2 tbsps

Vanilla essence – 1 tsp

Dark rum/cognac – 3 tbsps (45 ml)


Method:

1.     Preheat your oven to 180C and prepare your baking dish. (I used an 8 inch pan).

2.     Melt the butter. Set aside and let it cool.

3.     Peel and core the apples and chop them into tiny pieces (about ½ an inch). (If you like your cake to have chunky pieces, dice the applies into bite sized portions).

4.     Sieve the flour, baking powder and salt.

5.     In a mixing bowl, beat the eggs with the 150 gms sugar for about 8 minutes until it is light and fluffy and doubles in volume. (I used an electric beater for this).

6.     With a rubber spatula or a whisk, gently stir in the vanilla and the alcohol.

7.     To this, add half the flour mixture and gently stir. Add in half the melted butter and stir. Stir in the remaining flour mixture, stir and then the remaining melted butter. DO NOT OVERMIX.

8.     Fold in the apples and stir until the pieces are evenly coated with the batter.

9.     Pour into the baking dish and sprinkle the 2 tbsps sugar evenly on top of the batter. Bake at 180C for about 40 minutes or until done.

10. Done.


Wednesday, 23 September 2020

EGGLESS LEMON LOAF


21.09.2020: I have been spending more time on trying to click better pictures for the blog and have painstakingly been segregating items of clothing, showpieces, utensils for these pictures. As I go through other blogs, scrutinising their pictures, I make a mental note to purchase dried rose petals, bits of jute with frayed ends, black serving dishes, wooden slabs, bark coasters…. Pheew! While these items continue to remain on my Amazon  wishlist, I continue using random sweaters and leaves for my photography.

As I scrolled through my gallery looking for appealing food pictures to post on the blog, I realised the old ones did not match up to the current ‘pretty’ ones. The next morning, I took the butter out of the freezer and placed it on the kitchen slab. When Skip spotted it, he jumped with joy saying “cake, cake”. I told him I was not to be disturbed as I wanted to bake this soon and get back to my office work.

I have gotten quite adventurous during this period of work from home. Yes! Eggless baking is me being experimental. :D I came across this wonderful recipe for the eggless Lemon Loaf on Love and Flour by Pooja.


I love lemony desserts. The tangier it is, the more appealing I find it.

This cake is so buttery soft with the perfect hint of sweetness and citrusy flavour. The lemon frosting is tangy and the kind that gets you smacking your lips after a bite. Mmhhmm… so good.

Mamma asked me what the egg substitute was and from what I’ve read on the net, typically yoghurt, banana, condensed milk or flax seeds is used. I suppose the combination of milk and lemon (which is how I make Buttermilk at home for bakes) makes this cake so fluffy and crumbly.

Do try it out and if you enjoy it as well, you know what to do 😉.


EGGLESS LEMON LOAF

Ingredients:
All-purpose flour (maida) – 250 gms (1 ¾ cups )
Baking powder – 1.5 tsp
Baking soda – ¼ tsp
Salt – a pinch
Butter – 113 gms (1/2 cup)
Castor sugar – 200 gms( 1 ¼ cup)
Vanilla extract – 1 tsp
Milk – 100 ml (3/4 cup)
Lemon juice – 50 ml (slightly lesser than ¼ of a cup)
Lemon zest – 1 tbsp
For the glaze:
Icing sugar – ½ cup OR powdered sugar + 1 tsp cornflour
Milk – 1 tbsp
Lemon juice – 1 ½ - 2 tbsp

Method:
1.     Preheat oven to 180 C. Grease and prepare the baking dish.
2.     Sieve the flour, baking powder, soda and salt. Set aside.
3.     In a mixing bowl, beat together the sugar and butter until it is light and fluffy.
4.     Add the vanilla, lemon juice and zest to the butter mixture and mix well.
5.  To the above mixture, add the dry ingredients and milk alternately, whisking a little after each addition. Mix until streaks of flour disappear. DO NOT OVERMIX.
6.     Transfer the batter ( batter will be thick) to the dish and bake at 180 C for about 40 minutes or until done.
7.     For the icing: Add the milk to the sugar and mix well. Add the lemon juice and give it a good mix.
8.     Once the cake cools completely, drizzle the lemon frosting on it.
9.     Done.


Recipe Notes:
  •      I didn’t have castor sugar at home. So, I used coarsely ground granulated sugar.
  •     You can use plain powdered sugar as well for the lemon frosting.
  •      I like lemony, tangy frosting and added about 2 tbsps of lemon juice to the frosting. You may adjust the quantity of the lemon juice to suit your taste.


Related Posts Plugin for WordPress, Blogger...